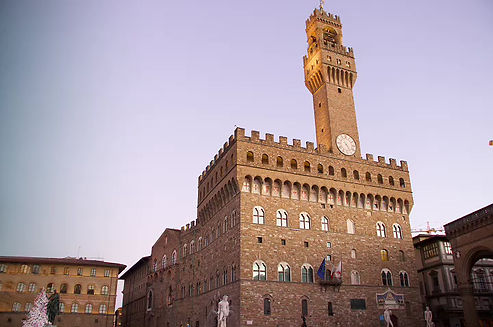
Changed the sky from daytime to a deep twilight blue to make the scene more cinematic. I boosted the reds and oranges of the Palazzo Vecchio to make it stand out more and corrected the perspective to make the building look perfectly aligned. I also cleaned up some distractions and added a subtle vignette to draw focus to the main subject.
Enhanced the colors to make them richer and more vibrant, making sure the warm tones of the rooftops contrast beautifully with the deep blue sky. I adjusted the framing so the Duomo was perfectly centered and added a vignette to darken the edges, keeping the attention on the main subject. I also sharpened some details to make the textures pop.


Made the lighting more dramatic by adjusting the highlights and shadows, giving the statue more depth. I straightened the angle so everything looked more balanced and used a subtle light effect to enhance the sculpture’s presence. I also worked on the texture and clarity to bring out the details since the original image was a bit dark.
Increased the brightness and adjusted the colors to make the scene feel warmer and more inviting. I cleaned up some distracting elements in the overhead lights and straightened the composition to make it look more polished. I also made the lights pop more, making them the highlight of the scene without overexposing them.


Boosted the contrast and enhanced the reds and oranges to make the colors more intense and eye-catching. I added a vignette to give the image more depth and even played with light rays to create a more dreamy effect. The goal was to make the reflection feel more magical while keeping a natural balance.
Played with the warm and cool tones to make the sunset feel more intense and dynamic. I sharpened the details while keeping the soft, dreamy vibe of the scene. To enhance the symmetry, I adjusted certain parts of the house, making the composition feel more balanced. I also refined the light so it appeared as if the golden hour glow was naturally streaming through the window, using a vignette and a slight blur in the foreground for a more artistic touch.


Did quite a bit here! I boosted the saturation and contrast to bring the scene to life, making the colors feel richer and more dramatic. I darkened the sky a bit to reveal more cloud details and even added some extra clouds so the sky didn’t look too empty. I also applied a subtle vignette to create a more cinematic and focused look.
Sometimes, you just need a bit of color to bring a scene to life. I enhanced the tones to make everything pop, making sure the warm hues of the buildings worked well with the bright scenery. I also added a light effect to the street lamp to make it look like it was actually glowing, giving the image more depth. Lastly, I adjusted some minor details to make the shot look cleaner and more balanced


This one just needed a few touch-ups. I adjusted the perspective to center the dome perfectly and removed a distracting tree that was throwing off the balance. I also gave the sky a bit more contrast to bring out the details in the clouds and make the blue stand out more.
Worked on the clarity and sharpness to highlight the details of the basilica while keeping a natural balance in the lighting. I removed some distractions, like screens and extra people, to keep the focus on the architecture. The sky got a little boost with a gradient effect to bring out the clouds and make the blue richer, giving the whole image a more striking look.
